PMI Guide to Studying
Tips, Techniques and Learner Wellbeing
About
Its important because its very rare we are good at everything, and a little guidance here and there can always help.
What we have provided here are a range of approaches to learning that improve your ability to study, and to retain and recall information.
Some people are naturally good at time management but may struggle in other areas such as essay writing. Another learner may be great at taking notes but isn’t great at putting a concept into their own words. To be able to really do your best in your studies and easily demonstrate your learning, you need to spend time developing your study skills.
We also take a moment to reflect on you and your well being. Exams are stressful at the best of times, especially when they are work related. You need to make sure you are ready to take an exam, and are in the right place mentally to do so.
Study Skills
Website Guide
This website has been created for learners primarily studying for PMI examinations, but can be used by anyone who has access to it and finds it useful. It is not the 'gospel;' it is purely an aid to revision, and does not need to be looked at from the first page to the last page, you can just dip in and dip out at the points relevant to yourself and your style of learning.
Disclaimer: The information collected in these pages are taken from various open souce materials and combined into a format for use as a learning aid. Please refer to the References Section.
What are Study Skills
We can describe study skills as “learning how to become a more effective learner”. They enable you to study and learn more efficiently, however, they do have to be practiced and developed. During your lifetime of learning and study you will have to; learn, interpret, condense and recall huge amounts of information. Clearly the specific skill, tool or technique you will use will be determined by; your preferred learning method, topic of study, environment and the time frame you have available. These next pages will cover:
- the 5 types of study
- how we learn
- ways to read
- condensing, summarising and cue methods
- how to take notes & study from books
- prioritisation
- visual & auditory techniques
- how to ensure you don’t miss anything out
- how to prioritise
- general study strategy
Some of these methods may be familiar to you, whilst others will not.
Baseline / Benchmark questions
In order to get a picture of your ‘starting point’ please answer the following questions.
- How do you currently study?
- Do you feel confident / competent in utilising a range of study skills and techniques?
- Do you know / have an idea about which method is most effective for your learning?
for example visual (seeing), auditory (speaking & hearing) and kinesthetic (doing)
- How would you condense your notes?
- How do you study from your books?
- Can you / do you recognise how to prioritise your notes?
- Are you able to adapt your style to the type of text you are reading?
- Do you know what apps and web based study aids are currently available?
1. Types of Study
Types of study
There are 5 main types or reasons to study. In practice you will probably combine elements of all of these:
1. To gather information (formulating a complete set of notes method):
- identify the information you need to learn
- organise, condense and record this information in a format that promotes your learning
- verify the completeness & accuracy of your notes
2. To learn information (moving information from short to long term memory method):
- repeated recitations of material
- flashcards – ‘hard copy / paper based’ or app / web based
- recall everything you can based on a keyword
- place incorrect recalls in one pile and correctly recalled ones in another
3. To check learning
- identify what has and has not been learned. This type of study requires a way to self-test method – for the material you think you have learned:
- look at the main point only and recite / write everything you know
- check for accuracy
- if you recall accurately and completely 1st time you could consider this material learned
- if you recall incorrectly or incompletely you know the material has not been learned fully
4. To refresh
- prevents you from forgetting and requires regular review and reciting method:
- prevent ‘fading’ of knowledge through regular material review
- you could do this independently or as part of a study group
- if you are an auditory learner, re-listen to your material 2–3 time per week
5. To improve learning skills
- this is the most underdeveloped learning skill students possess method:
- critically reflect on each test / exam to evaluate your study technique
- identify which study methods (e.g. diagrams, flashcards, recital, mnemonics, visual techniques) result in the correct recall of information and vice versa
- modify study skills that result in low scores / grades
Main ways to improve learning skills
There are 4 main ways in which you can improve your learning skills.
- You should apply critical reflective learning to measure and assess how effective a given method of studying is for you. Your grades and how you feel all combine to provide you with an individualised study aid tool kit.
- Break down the effectiveness of your learning skills by identifying:
- answers that were answered completely – ask yourself ‘what learning skills were used here?’
- answers that were incorrect or where you lost points – ask yourself ‘what learning skills were used here?’
c. Modify / replace learning skills that resulted in lost points
d. Use all the available resources you have access to, for example:
- study groups
- app / web based systems
- colleagues / lecturers
- audio options
- the tools and techniques given here
2. How do we learn?
How do we learn?
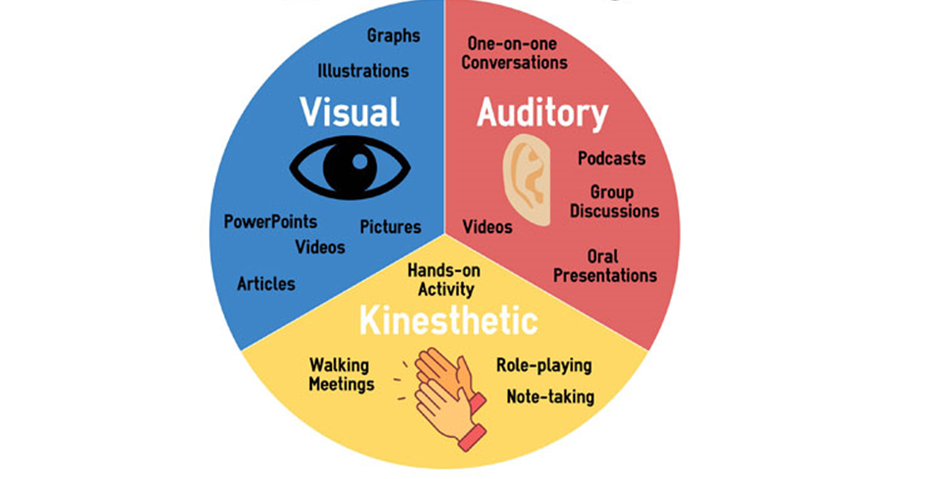
Neil Fleming (1987) suggested that people learn through a mixture of:
- visual – seeing
- auditory – hearing
- kinesthetic – doing
The theory behind this model is that most people will have a dominant or preferred learning style. It is worthwhile noting however that some people will have a blend of all three. If you want to test your own style there are many free versions available online, or you can complete the one below.

Visual
Visual learners…
| element | description |
| learn by… | seeing |
| think in… | pictures. Vivid images help visual learner to retain information |
| they are good at… | puzzles, writing, charts, graphs, pictures, visual metaphors etc. |
Study skill options for visual leaners include:
- note taking using – charts and diagrams
- highlighting information
- colour coding and organisation of information and notes
- converting words into pictures
- visual ‘pathways’ e.g. Method of Loci / Peg System
Auditory
Auditory learners…
| element | description |
| learn by… | listening |
| think in… | words |
| they are good at… | remembering the written word, speaking, listening, storytelling, teaching, writing |
Study skill options for auditory learners include:
- recording & replaying notes
- reciting information out loud
- using analogies – verbal
- taking part in group study discussions
Kinesthetic
Kinesthetic learners…
| element | description |
| learn by… | doing, touch & movement |
| think in… | activity |
| they are good at… | hands on elements, physical activity (including coordination), acting, building, crafts |
Study skill options for kinesthetic learners include:
- making models
- using diagrams and visual condensing methods
- reciting whilst counting on fingers
- remembering or recalling whilst moving around e.g. whilst walking or running
- some kinesthetic learners prefer to study with music
NB Kinesthetic learners may find it hard to sit still for long periods of time and may get distracted.
VAK questionnaire
In order to get an idea of your learning style(s), please complete the questionnaire and scoring system below. You may have a dominant style, or a combination of all three. Answer:
- all the questions
- each with a ‘yes’ or ‘no’
- as honestly as possible
| Number | Question | Yes | No |
| 1 | When you are describing a party/holiday to a friend, do you describe the music, sounds and noise you experienced? | ||
| 2 | Do you use your hands when you speak? | ||
| 3 | To keep up with the news/sport, do you prefer the radio or TV rather than reading a newspaper? | ||
| 4 | When you use a computer, do you find the visual prompts useful, e.g. the icons/pictures in the tool bars, highlights and underlines, etc.? | ||
| 5 | When you have to take down information, do you prefer drawing diagrams and pictures to writing notes? | ||
| 6 | When you play noughts and crosses or draughts, can you picture the ‘o’ and ‘x’ or counters in different positions? | ||
| 7 | Do you like to take objects apart and repair things, e.g. your bike, engines, etc.? | ||
| 8 | When you are trying to remember the spelling of a word, do you tend to jot it down a few times in different ways until you find the one which looks right? | ||
| 9 | When you are learning something new, do you like spoken instructions, talks and/or lectures? | ||
| 10 | Do you like making things? | ||
| 11 | When using a computer, do you find the bleeps and sounds useful to tell you that you have done something wrong or to show when you have finished something? | ||
| 12 | When you revise/study or are learning something new, do you like to use diagrams and/or pictures? | ||
| 13 | Are you quick and efficient at copying information down? | ||
| 14 | If something is said to you, do you usually remember it, without it being repeated? | ||
| 15 | In your spare time do you like doing something physically active e.g. sport, walking, gardening, etc.? | ||
| 16 | When you have spare time, do you like to listen to music? | ||
| 17 | When you are looking at a shop display, do you prefer to look around peacefully on your own? | ||
| 18 | Do you find it easier to remember people’s names than their faces? | ||
| 19 | When you spell, do you usually have to write the word down? | ||
| 20 | Do you like to be able to move around when you are working? | ||
| 21 | Do you learn to spell by saying the words out loud? | ||
| 22 | When you are describing a party/holiday to a friend, do you describe what people looked like, what they were wearing and the colours? | ||
| 23 | When starting a new task, do you like to get on and do something straight away? | ||
| 24 | Do you learn well by watching someone demonstrate a particular skill? | ||
| 25 | Does saying things out loud help you to learn? | ||
| 26 | Do you like showing people how to do something as opposed to writing a series of instructions? | ||
| 27 | Do you like role play and acting things out? | ||
| 28 | Do you prefer to go out and about to find information rather than sitting in the library or at your PC? | ||
| 29 | When you visit a shop, do you enjoy talking about the items on display, and listening to the comments of others? | ||
| 30 | Do you find it easy to follow a map? | ||
| 31 | Do you feel that one of the best ways to appreciate goods in a shop is to be able to reach out and touch them? | ||
| 32 | When you read a story or an article in a magazine do you picture the scene in your mind? | ||
| 33 | Do you tend to hum, or talk to yourself, when completing tasks? | ||
| 34 | Do you look at the pictures in magazines before deciding what to read? | ||
| 35 | When you are planning a new journey, do you like to talk to someone to find out where to go? | ||
| 36 | Have you always found it difficult to stay still for long and prefer generally to be active? |
Please see below for scoring. Remember, many people have a dominant style, but you will probably use a combination of all three when learning and studying.
Circle the questions you said YES to…
| 4 | 1 | 2 |
| 6 | 3 | 5 |
| 8 | 9 | 7 |
| 12 | 11 | 10 |
| 13 | 14 | 15 |
| 17 | 16 | 19 |
| 22 | 18 | 20 |
| 24 | 21 | 23 |
| 26 | 25 | 27 |
| 30 | 29 | 28 |
| 32 | 33 | 31 |
| 34 | 35 | 36 |
| VISUAL SCORE (total circled above) | AUDITORY SCORE (total circled above) | KINAESTHETIC SCORE (total circled above) |
People commonly have a main preferred learning style, but this will be part of a blend of all three.
Some people have a very strong preference; other people have a more even mixture of two or less commonly, three styles.
When you know your preferred learning style(s) you understand the type of learning that best suits you. This enables you to choose the types of learning that work best for you. There is no right or wrong learning style. The point is that there are types of learning that are right for your own preferred learning style.
Please note that this is not a scientifically validated testing instrument – it is just a simple assessment tool designed to give a broad indication of your preferred learning style(s).
3. Acrostics, acronyms, analogies & mnemonics
Acrostics, Acronyms, Analogies & Mnemonics
These 4 methods are often confused, but I don’t actually think this is an issue as long as the method is right for you. But for the purposes of these study materials we will go through the differences and specifics of each. All four of these methods condense information into something that is memorable, which could be; letters, poems, text or images (in the case of visual analogies). The key is to ensure the condensing method you use is one that can be easily recalled. Therefore, try a variety of methods and see which one(s) work best for you. You could also look online as many people post ones that work for them.
Acrostics
An acrostic is an invented sequence of letters that helps you remember a poem or other text. The first letter gives you the clue to the information you need to remember or recall. The best way to explain this is to show you some examples.
Example 1 – to memorise the planets:

Sometimes its noodles, sometimes its nacho's but you get the picture.
More appropriately for pensions then:

Just remember, you are just taking the first letter of the word and making a rhyme or poem out of it.
Acronyms
An acronym is an invented combination of letters, which is pronounced as single word. Each letter is a cue or suggestion to the item you need to remember. In pensions there are many, and many have become their own versions of the same acronym e.g. CETV, SIP or SIPP etc - look here for a fuller list of most of them:
https://www.pinsentmasons.com/out-law/guides/glossary-of-pensions-terms-and-abbreviations
Acronyms can often be confused with initialism in which words are shortened to their starting letters – for example DVD or FBI. But as I said before it doesn’t really matter what you call it as long as it works for you!
Analogies
Analogies are comparisons between unlike things that have some particular things in common. Examples would include:
- the human eye is like a camera
- a heart is like a pump
- sound waves are like the circular ripples that spread from a stone dropped in water
Analogies often begin with such phrases as: “It’s just like…” “It’s the same as…” “Think of it as…” Analogies enhance and enliven descriptions, express thoughts and ideas more clearly and precisely and help connect new concepts to things that are already familiar.
- A trustee board is like a board of directors..
- A pensions fund is like a savings account..
I realise it is a little more difficult in the financial services sector to develop appropriate analogies, but its not impossible.
Mnemonics
Mnemonics are techniques for remembering information that is otherwise quite difficult to recall. A very simple example is the ‘30 days hath September’ rhyme for remembering the number of days in each calendar month.
A lot of the information we need to remember and recall is in the form of printed or written words. This can often be difficult to encode and remember when compared to other stimuli such as; images, colours, sounds, touch, emotions and language. The three fundamental principles that underlie mnemonics are:
- imagination
- association
- location
If you can use and apply a combination of these three principles you can create a powerful study system. So, lets have a look at each of these three elements in greater detail.
Imagination
This is what you use to create and strengthen the associations needed to create effective mnemonics that are potent for you. The more strongly you imagine and visualise a situation, the more effectively it will stick in your mind for later recall. The imagery you use in your mnemonics can be as vivid as you like, as long as it helps you to remember.
Association
This is the method by which you link a thing to be remembered to a way of remembering it. You can create associations by:
- Placing things on top of each other.
- Crashing things together.
- Merging images together.
- Wrapping them around each other.
- Rotating them around each other or having them dancing together.
- Linking them using the same colour, smell, shape, or feeling.
- Location
This gives you two things; a coherent context into which you can place information so that it hangs together, as well as a way of separating one mnemonic from another. For example setting one mnemonic in a particular town can separate it from a similar mnemonic set in a city. You can build the atmosphere of these places into your mnemonics to strengthen the feeling and clarity of each location.
The Memory Palace
It seems to be appropriate here to discuss a 'new' concept in learning (even though the memory palace is a device that has been used since the time of the ancient Greeks), to help encode their memories for easy retrieval. This was a time before smart devices; if you wanted information at your fingertips you had to put that information in your head. You’d do it through a process the modern memory athletes call elaborative encoding.
The general idea with most memory techniques is to change whatever boring thing is being inputted into your memory into something that is so colourful, so exciting, and so different from anything you’ve seen before that you can’t possibly forget it
The memory palace technique is about changing your memories into images placed in a familiar mental location. The idea is that you can mentally walk through your Palace looking at your memories to recall them.
They can be big or small, indoors or outdoors, real or imaginary, so long as there’s some semblance of order that links one locus to the next, and so long as they are intimately familiar
The idea is to give your memories something to hang on to. We are pretty terrible at remembering things, especially when these memories float freely in our head. But our spatial memory is actually pretty decent and when we give our memories some needed structure, we provide that missing order and context. Creating a multi-sensory experience in your head is the other part of the trick.
Now, it’s very important to try to remember this image multisensorily.
The more associative hooks a new piece of information has, the more securely it gets embedded into the network of things you already know, and the more likely it is to remain in memory
Try to animate your image so that you watch it move. Try to think of what it might smell like or feel like and make it as vivid as possible. This is you processing your image.
Let’s look at a specific example to illustrate why this works.
Say your memory palace is your home. Take a moment to conjure images and memories of that place. We are going to stick to the outside of the house.
Mentally walk from the road to your front door, try to remember as many details as possible.
Let’s imagine that your partner has asked you to pick up some dog food from the supermarket on your way home. Now put the dog food, exactly how it looked in the supermarket outside of your front door.
Got it?
Okay, now lets try to turn the dog food into something more memorable.
How about a large dog, a Great Dane, sitting on your front porch, not like a Great Dane would, but like a person would. Let’s make them exaggeratedly chewing, but we’ll make it bubble gum instead of bone. Now the Great Dane is periodically blowing gigantic bubbles, so big that you’re worried they might pop. Maybe think about what that bubble gum would smell like or the strange smell of a mixture of bubble gum and dog. What would the dog’s skin feel like? What would it feel like to have to pick bubble gum off of the dog’s face?
Four hours from now when you leave work to head home you’ll remember you had to pick something up from the supermarket.
When you take a trip to your memory palace, walk up the road to your home and gaze at your front door. What do you think you are more likely to remember?
The dog food that you see all the time or the gum chewing Great Dane we created?
A professional memory athlete will put objects in multiple places within their palaces and have more than one palace in their repertoire. Some will even design their own fictional palaces in great detail, designed specifically as a place to hang memories.
The Memory Palace is a great way to recall a variety of things, but you will still hit a hard ceiling, and that ceiling conflicts with the Herculean amount of numbers some memory competitors can remember.
4. Reading Skills
Reading skills
To be a really effective reader you need to be able to vary your style depending on your material and it is likely that you already do this instinctively to some extent. Ask yourself how you would read:
- a blockbuster novel
- a newspaper
- a poem
- an instruction manual
When reading for pleasure you may read quickly, with few breaks and without worrying about having to recall details later. On the other hand, when consulting an instruction manual you may read only one or two paragraphs, but you read them very carefully, making sure you understand all the details. When reading complex material, since your objective is to understand it as well as possible, you will need to adapt your reading style to this purpose.
To become a flexible reader, you need to know how to select and use a reading style that is consistent with your purpose for reading. There are three important reading styles you should learn to use and each one has its own purpose – speed reading, skim reading and scanning. Knowing when and how to use these three reading styles will make you a flexible reader.
Reading materials when studying
When studying there will be many different types of material that you will need to assimilate, which could include:
- course materials
- books
- images
- audio ‘files’ / clips
- virtual learning materials
- DVD / videos
- journals
- online resources
- your own notes
The above sources of study material are usually found in 5 main themes; core, texts, suggested reading, course materials and finally other sources which may include your additional research and assignment bibliographies / references.
Speed reading
If you find it difficult to concentrate and your mind wanders when you’re studying, you could consider reading faster! If you read too slowly your thoughts can wander off on a tangent. You can easily train yourself to read more quickly, although it takes practice. To improve your reading speed you should practice:
- not reading every word
- not reading ‘aloud’ in your head
- reading in ‘fixation’ blocks
The speed reading method:
- relax
- focus
- use a ruler or index card to guide your eyes down the page of text, line by line, or, just run the end of a pen under each line
- move the pen, ruler or card smoothly across/down the page, and force your eyes to keep up
- ensure you don’t fixate on each and every word
You will be surprised how much you take in using this approach!
Skim Reading
A skimming style is most useful when you have to read a large amount of material in a short amount of time. When using the skimming style, you should identify the main ideas in each paragraph and ignore the supportive details. Because you are looking only for the main idea in each paragraph you read, a lower level of comprehension is to be expected than if you were using a more in-depth strategy. The aim of skim reading is to get the general idea, gist or overview of a texts content. The aim of this method is not to have a detailed understanding of the text. This approach is highlighted by the famous Woody Allen quote… “I read War and Peace…it’s about Russia!”
The Skimming method
- get an overview of the text through the contents page
- read the first and least sentence of each chapter, section or paragraph to see where the text is going and what it’s covering.
Scanning
Scanning is what you do when you read very quickly for a specific piece information within a larger amount of material. Since you know exactly what you are looking for, move your eyes quickly over the reading material until you locate the specific piece of information you need to find. An example would be when looking up a number in a phone book. You can use headings and titles and formatting clues – for example bold or indented text to help you hone in on what you’re looking for.
So in summary before you begin your next reading assignment, identify your purpose for reading. Decide if you are reading for a high level of comprehension, trying to get a general idea about what you are reading, or looking for specific information. Then use the reading style that is most appropriate for your reading purpose. Remember, if you are an auditory leaner you may wish to read out aloud or record your notes.
5. Condensing & summarising
Condensing & Summarising
Condensing and summary methods vary depending on the topic, but all involve reducing a large amount of information down into something shorter, for example; notes, images or diagrams. These methods give you a visual summary of a topic that preserves its logical structure and any linkages or inter-dependencies.
The 5 main methods that I will be looking at are:
- keywords
- tree structure
- spider diagrams
- mind maps
- concept maps
Keywords
Keywords help with memory recall by condensing large amounts of information into a single word or short phrase that is easy to remember. The key to success is to pick a word that unlocks a large amount of information.

Don’t be tempted to highlight too much text. We have all seen, or will have done it ourselves where nearly all the page has been highlighted and we believe everything is important!
Keywords methods
- read a sentence
- ask yourself “does it have a key word”?
- if no read the next sentence, if yes, highlight it or write it down
- repeat this process for the entire page / notes
- cover up your full notes and use your keywords only to write down what you can remember – this will show you how effective your keywords are
- check for effectiveness; immediately, after a few days and after a week to really test your method
Tree structure
Tree structures or diagrams allow us to see all the possible outcomes of an event and calculate their probability. Each root, branch or leaf in a tree diagram represents a possible outcome.
Types of tree diagram include:
- relationships
- family / history tree
- fault tree
- organisational chart
- work breakdown structure – for example with that seen in project management
As hinted above, a typical decision tree comprises some three main components. These are:
Root Node
It is the top-level node and represents the ultimate objective or the decision to be made. As expected, this node stays atop the entire structure, and it is from it that all the other elements flow. The manner in which this node is stated definitely has a bearing on the kind of direction that the rest will take.
Branch Node
Branches stem from the roots. They represent the various courses of action that may be taken to solve the given issue at hand. In most cases, they are indicated by the use of the arrow lines. Depending on the exact kind of decision to be made, the branch nodes may also incorporate associated costs.
Leaf Node
Leaf nodes are attached to the branch nodes. They, as we have already stated, represent the possible outcomes for each of the actions taken. These nodes are available in two main kinds. They are the circle nodes that signify the unknown outcomes or chances and the square nodes that indicate the need to make another decision. In pensions it may be that the roots are the main topic and the branches the components that make up that topic for example this is the process tree structure for safeguarded benefits:
 You just choose the topic (root), break it into smaller sections (branches), expand the information from the branches (leaves).
Spider diagrams
For essay writing in particular, there is a huge benefit in having a bird’s-eye view of your subject matter. This allows you to look over all that could be said and pick out the most relevant parts, while leaving plenty of mental space for the crafting of a comprehensive and well considered argument. Spider diagrams are an excellent tool for creating an overview and remembering it crisply. They help distil complex topics onto a single memorable page by using a branching spatial organisation, colour and images.
The two primary reasons that spider diagrams are such a powerful tool are;
- that they are memorable and that the addition of colours, pictures, and simple keywords creates a spatial structure and
- image that is easy for your memory to explore.

Mind Maps
Mind maps help you to generate ideas and make associations. They are a powerful memory aid in an examination because they are visual in nature and show the relationships between component topics within an overall subject area.

They were originated in 1974 by Tony Buzan, where he discusses his influences to Leonardo da Vinci, Albert Einstein, and Joseph Donald Novak in his processing of information.
What it has produced is one of the most used mental recall products used today.
As an example, below is a mind map of the DC Pensions world produced by the Quiet Room (it can be found here):

This technique has a number of advantages:
- it enables you to see a large amount of information / thought processing on one page
- your central idea is clearly stated in the middle of the page
- you can show connections between key concepts
- additional information can be added easily
- the open ended nature of the pattern means that you may be able to make new connections
Concept Maps
The final condensing or summarising method I have identified is the concept map.
This is a way of representing relationships between ideas images or words in the same way that a road map represents the locations of highways and towns, or a circuit diagram would show the workings of an electrical appliance. In a concept map, each word or phrase connects to another, and links back to the original idea, word, or phrase. As such they are a way to develop logical thinking and study skills by revealing connections and helping you see how individual ideas form a larger picture. Concept maps were developed to enhance meaningful learning in the sciences. A well-made concept map forms from a clearly defined “focus question”. Research has shown that because concept maps are constructed to reflect organisation of the declarative memory system, they facilitate meaningful learning for those who create and use them.
6. Cue Methods
The most widely used cue method is the flashcard. Nowadays these can be electronic in nature and there are many apps or sites where these can be created or downloaded (see section 15), although of course the ‘traditional’ index card style approach is just as beneficial. Which ever method you use the principle is the same:
- they are a two sided (or virtual two-sided) aid
- one side contains a cue, question, concept or even image
- the other side the ‘answer’ or expansion
One of the primary reasons for their success is they require active recall and each time this is practiced you force your brain to remember or recall information. Below are 2 examples of cue cards showing carbohydrates and Pythagoras Theory – the blue side being side one and green being side two.

7. Note Taking
It is important that your notes are complete and accurate. The best way to be certain that your notes are complete and accurate is to review themas soon after the instuction/lesson as you can while the information is still fresh in your mind. As you rewrite them you should correct any errors, fill in any gaps and add any additional or supporting information as required.
A ‘side’ benefit from rewriting your notes is that it reinforces the information helping you to remember and recall it more effectively.
Rewriting your notes method
- re-read your notes two or three times before beginning to rewrite them, so that you have the ‘big picture’ in your mind
- re-write your notes in format that shows the connections and relationships between topics, concepts and key terms
- ensure what you have written makes sense and you understand it
- ascertain that the information you wrote in your notes is consistent with any corresponding information in supporting textbooks
- look for additional sources of information that will give you greater insight
- consider changing any abbreviations and symbols into complete words and statements
- highlight the most important words and concepts
- make a note of any questions you think you may need to ask in order to clarify or expand your thinking
This is all very well, but, what you really need is a way of taking really effective notes at the time rather than having to re-write them. The two main ways you can do this are by using the Skeleton Prose and Cornell Note Taking Methods.
Skeleton prose
This is the most common form of note taking. Notes are structured as a sequence of numbered points and paragraphs, with headings and indentations which resembles an essay plan. It is a useful technique for books or articles where arguments are static and built up slowly and sequentially.
The negatives of a skeleton prose are that they: are difficult to add to or amend do not indicate the relationship or connection between different parts of the argument easy to fall into the trap of coping text verbatim
The Cornell note taking system
This method of note taking was devised for students at Cornell University in the USA and has been publicised through Walter Pauk’s books on study skills for University education.
It provides you with a structured, common-sense way of making sure that you take clear notes, engage with them actively and have accurate material from which you can study or revise. It prevents you from having to laboriously recopy your notes when revising or studying – a so called ‘do it right first time’ method.
The advantages
The advantages and benefits of this note taking method can be summarised as:
- it provides a clear set of condensed key ideas you are able to engage with the material which helps recall that information at a later date your notes provide an invaluable resource when preparing for and revising for exams or further study
The method
Prior to revising/making notes:
- on a A4 sheet of paper create a summary space along the bottom
- draw a vertical line through the remaining sheet so you have 2 sections – the left hand side being a third of the space of the right
- label the left section keywords & questions
- label the right section notes
Consider having these sheets pre-printed as a blank template so can always have with you, or as an electronic document, for example word or pages. Additionally you can do any pre-reading around the topic under consideration / discussion.
During revising/making notes
- record your notes in the right hand column – you are not aiming to write everything, but rather arguments, general ideas, facts etc.
- if you use abbreviations ensure you can recall these after the event
- leave spaces so you can add to your notes or amend then afterwards

Once completed and preferably within 24 hours:
- read through your notes and add or amend anything
- produce a summary in the space you created along the bottom of the page
- write down key words and ideas in the left and column and turn these into a set of questions
- cover up your right hand column notes and test yourself as to how well you can answer the questions you composed
8. Studying from Books
There are two main ways you can study from books, namely the PQRST & SQ3R methods. Both of these methods of studying focus on the key information in books. Its unique approach is that it prioritises information using a method that directly relates to how you will be asked to use that information in an exam.
PQRST
PQRST stands for:
- Preview
- Question
- Read
- Summary
- Test
P is for Preview
Look at the topic you need to learn by skimming over the main headings and points.
Q is for Question
Formulate questions that could be asked.
R is for Read
Re-read all the material, concentrating on the information that best relates to the questions you formulated in the previous step (Q is for Question).
S for the Summary
Summarise your topic in your own words. You could use any of the condensing and summarising methods we have already covered.
T is for Test
Using the questions you developed earlier answer each one in turn. Ensure you pick a whole range of questions and not just the ones that you find easy to answer!
The benefits of PQRST
The PQRST method ensures:
- information is studied in a way that directly relates to questions that may be asked
- the method can be adapted to any subject
- allows you to practice how to time your answers
- you can potentially preempt the questions you will be asked
SQ3R
A second method you can use when studying from books is the SQ3R. This 5 step technique stands for:
- Survey
- Question
- Read
- Recall
- Review
S is for Survey
Start big and then go small – survey the whole book, then the chapters and finally the paragraphs. Also look at the titles, headings, and subheadings, picture captions, charts, graphs or maps, introductory and concluding paragraphs and any summaries. The aim of this is to get the general ‘gist’ of the material.
Q is for Question
By questioning the text you turn it from an passive activity to an active one. Ask yourself:
- why are you reading this and what is it’s purpose?
- what do you already know?
- what do you want to know?
- what is new or interesting about this material?
- does this support / supplement / contradict what I already know?
Try converting the title, headings, and/or subheadings into questions. Examples of questions you could ask include:
- What do I already know about this subject?
- How does this chapter relate to the assignment question?
- How can I relate what I read to my own experiences?
R is for Read
After questioning you will be ready for the main activity of reading. This involves careful consideration of what the author is trying to convey and involves being critical as well as active.
- firstly skim read concentrating on the main ideas and general text structure
- secondly read again to make notes on the key points
- look for answers to the questions you raised in ‘Q is for Questions’
- make sure you re-read any parts which are not clear
R is for Recall
It doesn’t matter how interesting (or not!) the text is, you must make a concerted effort to recall what you read. Failure to do so will result in information being forgotten. Recalling also provides you with the opportunity to think about and assimilate what you have just read keeping the process active.
Ask yourself “can I recall all the key facts without re-reading the text”?
Try and answer questions about what you have read and/or try and summarise what you have read. This summary should be in your own words and you should consider highlighting key words and points. Also consider using a variety of senses in order to recite and recall. Seeing, hearing and saying is known as triple strength learning, whereas quadruple strength consists of; seeing, hearing, saying and writing.
R is for Review
The final step in the SQ3R method is to review the material that you have recalled in your notes. Ask yourself:
- did you understand the main principles of the argument?
- did you identify all the main points?
- are there any gaps?
Double check you haven’t missed anything of importance. There is sometimes a temptation to ‘miss out’ pieces of information and associated questions that cover areas we do not enjoy or we find hard!
SQ3R plan
Below is a sample 7 day plan for using the SQ3R method that you might like to use. Remember it can be and indeed should be adapted for your own individual needs.
Day 1
- read the text
- formulate potential questions
Day 2
- review the important points you have highlighted
- answer the questions you formulated on day 1
- make cue / flash cards – you could do this for all the questions, or just those you find difficult
- condense / summarise any other information using one of the methods described in the previous sections
Days three, four and five
Alternate between your condensing method and notes and test yourself (orally or in writing) on the questions you formulated. Add additional condensed material if required.
Days six & seven
- list the topics and subtopics each chapter / ‘chunk’ of information contains
- create a ‘map’ for each element
You will now have a summary of the whole book/module.
9. Prioritisation
When studying a common pitfall people fall into is setting out to learn everything in the order in which is was presented or delivered. However, for a variety of reasons which could include time constraints, fatigue or sheer volume of material this may not be possible, or as you will see, even desirable. So, we need a method of separating what is essential you know, i.e. what is likely to make up the majority of your exam marks, from what would be great to know if you had unlimited time and energy.
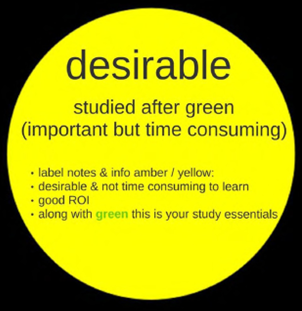
One such method is the traffic light approach.
The Traffic light Approach
Green:
Take a green pen and mark everything that is essential to know for your exam. These topics should be studied first and will allow you to progress to the less number of amber and red topics. These green areas are often found first on a syllabus and may be the easiest concepts to learn but also the easiest to underestimate.
Amber:
Take an orange, gold, or even yellow pen and label everything that is either essential to know or is not too time consuming to learn. These items will form the mainstay of your learning and range from topics leading from the green to the red range of topics.
Red:
Take a red pen and label everything you would want to know if you had unlimited time and energy. Red topics should never be studied at the expense of the essential green and desired amber topics.
Red topics would include overly complicated ideas and subjects that may add one or two marks but will cost you a great deal of time and focus. By focusing on green and amber topics those that seemed red at the start may become more amber as time goes on.
This colour system visually reminds you to get moving and motivated on green topics and discourages wasting time on red ones. Additionally it provides a progressive learning system that is logical and less likely to become ‘bogged’ down in the minutiae.


10. Visual Methods
Visual study methods allow you to not only condense large amounts of info but the potential colours and images you can use provide a different sensory experience to text alone. We have seen this in previous sections for example in the case of spidergrams, mind maps, trees and concepts.
In this section we will look at two other visual ways of studying and remembering information using familiar places and the neural building of a pathway and story.
The first is The Method of Loci and for those of you who have watched Benedict Cumberbach in Sherlock Holmes, this is the method he uses in his ‘mind place’. It can also be seen in Elementary and Hannibal. The second method is that of The Peg or Hook System.
Method of Loci
The loci strategy was developed by the ancient Greeks and the word loci comes from the plural of locus, which means place. The principle of this strategy is that it is based on a familiar place, such as your home and helps you remember lists of items through organization, visualization, and association. It is particularly beneficial if you are good at picturing things in your mind.
- The Method of Loci steps:
- identify a place you are familiar
- visualise that place and all of its features
- associate each item that you need to remember with a particular feature of your place. It is worthwhile noting that the more unusual the association you make the more likely you are to remember it
- practice mentally ‘walking around’ your place and test how good your associations are and how well you can recall the information required
The best way to explain this in greater detail is by showing you a couple of examples. One a random list and another that is connected.
Examples of the Method of Loci
Example 1 – remembering 5 random items; pigeon, clown, lemon, ants, puddle. In this example the familiar place will be the kitchen. So, my pathway could be as follows:
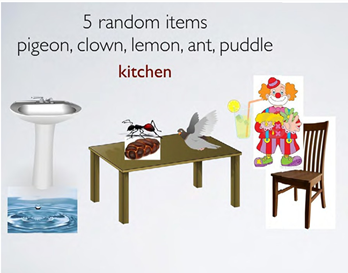
- I walk into my kitchen
- a pigeon lands on the table
- sat at the table is a clown drinking lemonade
- in front of him is a piece of bread covered in ants and behind him the sink is overflowing creating a puddle on the floor
In this second example we will see how you can use this method to remember connected and not random information. This example uses one we looked at earlier in acrostics and it is the order of planets.
So, as with the first example you would need to set this somewhere that is familiar to you – and your pathway might be…you see a Mercury thermometer in the mouth of Venus, who is balancing a football shaped Earth on her head. On the floor is a Mars bar wrapper that has been dropped by Phil Jupitus (Jupiter), he is wearing a hat made of Saturn’s rings. You then turn round to see a chair in the shape of the Uranus symbol which Neptune sits.

Top tips
The Method of Loci is particularly powerful when relating pieces of information that are not easy connected. It does however, require an initial intensive period to practice the method and establish what kinds of visuals work for you.
Hints/Tips to help should you choose to give this method a go:
- give yourself time to practice – it’s not going to come straight away, especially if visual learning isn’t ‘your thing’
- really focus on the place you are using. Immerse yourself in everything about it – this is a highly active not passive journey
- you may find it easier to use familiar items and connections to start with and then progress to more obscure connections later
- a boring image is not going to work, it needs to be as emotionally and visually stimulating as possible
- consider using things other than images. By utilising all of your senses you are more likely to create something memorable and repeatable. So, consider smells and noises as well
The Peg / Hook System
This method works by associating the numbers 1 to 10 with words that rhyme. You can then associate these words with the information you need to remember. So, lets explain this in a little more detail. Here you can see examples of words that rhyme with numbers 1–10. Remember the words you choose will be different depending on your accent.

Example of The Peg System
As with the Method of Loci above, let’s have a look at an example so I can show you the peg system in operation.
If you wanted to remember that the Earth is the Third planet, you could visualise a image of Earth with a tree on top. Tree rhymes with 3 therefore this visual image helps you to recall that the Earth is the third planet.

Now we have looked at visual methods of studying, lets move on to auditory ones.
11. Auditory methods
We saw earlier in section 3 that people learn through a mixture of:
- visual – seeing
- auditory – hearing
- kinaesthetic – doing
You could learn from listening to:
- module summaries
- revision key points of notes
- language – if studying vocabulary
- another student
- your tutor
- audio books
- podcasts
- ‘spoken’ PDF files – there are various app available for this purpose You could also record your own notes on:
- heldheld devises – dictaphone, phone
- your computer
- plug-in microphones / headsets
- apps – text-to-speech, speech
- webreaderHD etc.
Once your audio recording has been made you can listen to it in a variety of places that includes:
- at home
- whilst travelling
- when exercising
- Pre-recording checklist
Before recording you should consider:
- checking your recording equipment – do a short test before recording a large volume of material
- ask yourself what the objective of your recording is for – for example, remembering key ‘trigger’ words or concepts in depth
- are these notes for your own use, or do you intent to share them. This will effect the quality and format you convert your recording into
- how do you want to record your information – in small ‘bite sized’ sections or a large block
12. Dont Miss anything out
You would think it would go with out saying that you shouldn’t miss anything out when studying and answering questions. However, we have already seen that when revising you need to ensure the maximum ROI (return on investment).
The next two methods we will examine ensure that once you have been asked a question you consider and answer every aspect. When you combine this with the study method of predicting questions you may be asked, you will develop a robust and comprehensive study system. The methods we will be looking at are the Black Red Green and PEE.
The Black-Red-Green Method
The Black-Red-Green method was developed through the Royal Literary Fund. This method helps you to ensure that every aspect of the question that has been asked has been considered
The Black-Red-Green Method Stages
Read the question given and underline relevant parts of the question using:
- BLAck is for BLAtant instructions – something that must be done (an obvious instruction or directive)
- REd is for REference point, or REquired input. This is usually to do with definitions, terms, theories, authors etc.
- GREen is for GREmlins, or GREen lights – these are subtle signs that you could easily miss, or hints on how you should proceed or place your emphasis
PEE
Another popular method to break down and answer a question is the PEE approach:
- Point
- Evidence
- Explain
This method builds an argument around a series of logical, coherent, linked paragraphs.
The PEE Method Stages
Build an effective paragraph using:
P = Paragraph that makes one point in the right depth
E = Explanation, Evidence and Examples
E = Evaluation
You may also want to consider leaving some lines in between each paragraph in order that:
- you can add further explanation or evaluation if exam time permits
- you signal you have moved from one point onto the next
- it is easier for the marker to read
PEE Expansion
So, lets expand on explanation, evidence and examples and evaluation – the ‘E’ ‘E’. Explanation, evidence and examples These form the bulk of your paragraph and provides you with the opportunity to demonstrate your knowledge and understanding of the topic being questioned.
You should construct well written, robust analysis which is written in logical, flowing sentences. One of the ways you can do this to great effect is the Seven Point Scale for Perfect Paragraphs (see below).
Evaluation
You should include evaluation in each of your paragraphs and not just the concluding one. You should ask yourself:
- how important is the point or argument you have made?
- what does your argument depend upon?
- do your sentences build on each other?
- to what extent is your argument based on facts, opinion or unreliable data?
The Seven Point Scale for Perfect Paragraphs
| Step | Explanation |
| 1 | open using words from the question to give focus |
| 2 | use relevant theory to explain and analyse the point |
| 3 | follow a logical path of analysis (use connectives) |
| 4 | use ‘hooks’ and ‘cues’ from the question to support and form your points |
| 5 | use real examples and evidence to support your point |
| 6 | come back to the question for focus |
| 7 | conclude with an evaluative statement |
Multiple Choice Questions
We all know that the best way to ace any exam is to study and revise lots. But, there are also some tips and techniques that can help you succeed at a tricky multiple choice exam.
1. Read very carefully
Take the time to carefully read each question and answer choice. Use a highlighter to ensure you catch words in the question like “not” and “except” that could easily trip you up. Many students choose the answer that is the opposite of the correct response simply because they miss a word, misread the question, or forget what the question is actually asking.
2. Come up with your own answer
Once you understand what the question is asking, think about what the right answer should say or contain. Use that ideal answer as a yardstick to measure the available choices. This can help you avoid falling into a trap.
3. Look for common types of wrong answers
It is hard to write a good multiple choice exam, so instructors often fall into patterns, particularly when formulating wrong-but-attractive choices. If you learn to recognize frequently used options, they will be easier to eliminate. Some common wrong answers include: reversals (for instance, the answer may feature an error in chronology, characterizing the first event as the second, or a detail that is the exact opposite of the truth), true but irrelevant (the information in the answer is true, but not relevant to the question posed), too extreme (the answer takes a fact that is true but exaggerates it to an extreme. For instance, it will insist that it is “always” true, when in reality it is only sometimes true), and getting one detail wrong (the answer is oh-so-perfect…except for one little detail that you will spend way too long obsessing about and rationalizing away).
4. Eliminate answers in two rounds
The process of elimination is central to success on multiple choice exams. In general, you want to conduct your eliminations in two rounds. During the first round, eliminate anything that is flat out wrong: the answers that contain false information, that are irrelevant to the question, etc. In a perfect world, this would lead you to one correct answer. More often than not, this leaves you with two options, over which you are likely to agonize. This is where the second round of elimination comes in. Before you obsess over your remaining answer choices, re-read the question. Remind yourself what you are looking for in a correct response. Then, compare the remaining responses. If you cannot find a difference between them, then it is likely that neither is correct and you have eliminated the correct response earlier. Usually, you will be able to find a few differences among the remaining options. So, which answer corresponds most with the course material and the question posed?
5. Do not obsess over your choices
Excessive vacillating between two answer choices is usually a waste of time. If you’re down to a couple of options, you have a 50% chance of choosing the right answer. Compare your remaining choices, isolate similarities and differences, and make a choice. Usually, multiple choice exams have lots of questions, and they are all worth the same amount. Don’t waste time obsessing over a hard question, when an easy question does just as much to raise your grade.
6. Manage your time
Before the exam begins, look at how many questions there are in the booklet and divide your time into segments. Tell yourself: “I will have completed 50 questions by the x minute mark, 70 by the y minute mark, etc.” When those time markers arise, check to see how many questions you have completed. If you are behind, start to push yourself to make quicker decisions once you’ve narrowed your choices down to two. Do not check the time after every question! This is a waste of your time. However, you need to be cognizant of the clock in order to ensure you get to all of the questions. As mentioned, usually questions are weighted equally on these types of tests, so there is little benefit to completing hard questions rather than easy ones.
7. Answer every question
If you have not completed all of the questions when there are only a couple of minutes left, pick a lucky letter and guess on all remaining questions. Depending on how many options there are for each question, you have a 20-25% of guessing correctly! And a guessed correct response is worth just as much as one that is based on careful reasoning, time management, and studying.
General rules for written answers
Here are seven ways you can ease the pressure in a written exam.
1) Find out what you have to do
One of the best ways to lose marks is to do something other than what you’ve been asked to do.
- How many questions do they want you to answer?
- How many boxes should you tick?
Every exam paper comes with instructions, so make sure you understand what the examiners are asking you to do before you get stuck in.
2) Read the questions thoroughly
Another great way to miss out on marks is to go full steam ahead without understanding the question first. What question, exactly, are you being asked to answer?
Modules are broad and varied. But exam questions are specific and narrow. Read the wording carefully so you can recall your knowledge of that exact part of the syllabus.
3) Decide on your timings
The only difference between coursework and exams is time. All the tricks that help you write a great assignment will help you in an exam too - you just have less time to perform them. Before you start writing, make a schedule. Think about how long you have, how many marks are available for each answer, and how long you should spend on each one.
4) Plan your answer
As well as working out your timings, take some time to decide what your answer is. You wouldn’t start an essay until you knew what you wanted to say - exams are no different. If you’re in an essay-based exam, plot your structure by outlining an introduction, points to argue, and a conclusion. When you do start writing, you’ll be more focused.
5) Make sure it’s relevant
A common consequence of not planning your answer is an essay full of interesting but irrelevant facts. When you write ‘on the fly’, it’s easy to brain-dump everything you know. But that’s not what the examiners want. They want a response to the specific question that’s been asked. So think about what you know, and cherry-pick the bits that are relevant.
6) Mention your sources
More often than not, your response to an exam question should be an argument based on evidence. The examiners are just as interested in the evidence as they are in the argument. Think back to your revision and reading on this topic. Which authors were important?
Use their ideas to support your answer, and make sure you name-check them.
7) Leave some space
Inspiration doesn’t always strike right away. Sometimes you need time to warm up. So if you hit a bit of a wall with one question, leave a big space and move on to the next one. This means you’ll attempt each task, and that’s a better strategy than answering just one question really well. And when you find the right ideas for an earlier question, you’ll be able to go back and add them in.
Short Answer Questions
Many exams and tests will have a section of short-answer questions.
The following are tried and tested tips and techniques you can use to help you get through your exam:
1. Deconstruct the question.
Identify three types of words: task words, topic words and limit words.
This list of task words will guide you on the meaning of common task words. Deconstructing a question.
2. Rephrase the question in your own words.
3. Plan the structure of your answer before starting to write.
Make sure you deconstruct the question and consider using the PEEL paragraph structure. Writing Paragraphs.
4. Use examples to give evidence and help give your writing credibility.
5. Use plain language and keep your writing straight to the point. Use the words from the question in your answer to signpost your answer for the marker.
6. Use the mark allocation to plan how much time to spend on each question.
7. Practice writing short answer responses.
Doing practice questions in exam conditions will improve your performance in the real exam.
Past exam papers are available on the PMI Learning Websites:
Long Answer Questions (Essays)
There are a number of key straegies when answering longer exam questions.
These are:
TIMING
Work out how long you have to answer each question i.e.
- If you are required to answer 3 questions from 5 in 2 hours, the time per question is 40 minutes.
- If you are required to answer 4 questions from 6 in 3 hours, the time per question is 45 minutes.
Its better recommended, with discussion type questions, that you spend the first 5 minutes of each answer preparing a short answer plan.
This is time well spent, and although it reduces the time you have to write your formal answer, it generally leads to a better structured and reasoned answer. It also avoids the temptation to write everything you know about a particular topic without actually answering the question.
Always answer the questions you are more familiar with FIRST, leaving the “hardest” questions to last. All answers are worth the same marks, so try and get as many marks as possible by answering what you feel are the “easiest” ones first.
Do not be tempted to run over time with a question you know lots about – all answers are worth equal marks, and waffle obtains few marks.
ANSWER PLAN
Read the question, read the question again, and then write yourself some bullet points about how you will answer the question. Read the question again, and check that your model answer actually answers the question. This should take no more than 5 minutes.
START WRITING
Use your answer plan to construct your answer. You should always write in full sentences, unless the question specifically asks you to “list”.
Bullet point answers where an essay is expected, will, at best, receive HALF marks.
The marker cannot be expected to guess what you mean if you have not explained your point sufficiently.
An exam is your opportunity to demonstrate your level of understanding. If you have run out of time, the aim is obviously to get as much relevant information on the exam script as possible, but hopefully you have managed your time better.
WHAT IS THE QUESTION ASKING FOR?
Check carefully the language used in the question, and make sure you do what it asks.
EXPLAIN
This is asking for your understanding of a particular situation or topic. A clear and detailed account is expected. Use of examples may get your point across more easily and usually attracts higher marks.
DISCUSS
This is asking you to consider a topic from a number of viewpoints. As the word suggests, a discussion is expected. This implies some use of critical analysis, perhaps considering a point or topic from a number of angles. Again use of examples can be helpful.
COMPARE AND CONTRAST
As the words suggest a discussion of the similarities and differences of two or more entities is expected here. A good approach is to discuss the entities one by one, under clearly labelled headings, rather than provide one long answer which jumps back and forth between entities. Here is where your answer plan is invaluable.
EXAMINE
This requires some demonstration of detailed knowledge. As the word suggest you are expected to inspect or scrutinize in your answer. Again, use of examples may help.
OUTLINE
It is unlikely that an entire question will be based on an outline. The question may ask you to outline a process, and explain some entity further. If this is the case do not spend too much time outlining, leaving too little time to explain sufficiently. An outline requires little detail or analysis.
COMMENT
This is a bit like “discuss”. You are expected to use critique and examples. “Comment” may be used where a number of issues arise, and given the time permitted per question, you will probably not have time to dwell on each point you make. Make sure you do explain your point sufficiently however, and avoid the use of bullet points if possible.
ANALYSE
As the word suggests some analysis is expected. e.g. A good answer would perhaps show two sides of an argument with a justified discussion in support of one side of the argument. Be critical in your analysis, demonstrating your knowledge on the topic.
LIST
This normally appears in qualifications upto Level 3 or 4 and will allow you to use those bullet points. It is likely that this will form only part of a question, with some form of discussion or analysis requested to follow.
MOST IMPORTANTLY - READ OVER YOUR ANSWERS
If time permits read over all your answers at the end to check for spelling and grammatical errors. Try and write legibly. I appreciate that this is difficult, but if your script is truly unreadable the marks you deserve cannot be awarded.
Case Studies for Online exams
Exam questions that ask you to anlayse case studies (also called scenarios) are usually designed to test your ability to relate theories and concepts to real-world situations.
Preparing for case studies before the exam:
- Start by identifying the theories and concepts covered in your course. Organise and review the information you have on these theories/concepts so you understand them.
- Practice reading case studies and identifying relevant information. It's probably useful to practice doing this with a time limit as you will have one in your exam.
- Practice relating concepts and theories to real-world situations: ask lecturers and check textbooks for practice examples. It is also worth checking past exams for your course to see if there are examples of case study questions.
During the exam
Take time to plan:
Have a clear idea of how much time you have to answer the question. Then plan to spend some time reading the exam question, the case study and planning your answer.
Take time to make sure you have understood the case study and know what the exam question is asking you to do:
- Read the exam question(s)
- Then skim read the case study to get the general idea. Highlight or underline key points
- Reread the question to make sure you understand it and to focus your attention when you reread the case study.
- Reread the case study carefully. Make a note of any ideas that you think of.
- Answer the question linking relevant theories and concepts to specific information from the case study. Usually you will need to write your answers in clearly formed paragraphs which have a clear topic that is well-supported with evidence and examples.
- Instead of simply describing or restating information from the case itself, use specific details or examples to support the points you are trying to make. This is where you link theory to the facts from the case study.
Case Studies for the CPC Exam
The Units for the Certificate in Pensions Calculations (CPC) are assessed by centrally devised assessments, i.e. case study exams set and marked by the PMI.
Learners must demonstrate their competence to deal with member events across four areas:
- Retirement
- Death
- Leavers
- Transfers
Exams are held twice a year in March and September and are assessed online.
Learners must ensure that suitable accommodation is available for the exams to be held, as the exam space will be checked prior to invigilation.
Because the case study examinations are intended to simulate the normal working environment, learners are allowed to have with them any reference material that they need, i.e. they are ‘open book exams’.
The exams assess the learners’ ability to carry out manual calculations for members of three different pension schemes and to communicate with the member or client. The three pension schemes are examples of different types of scheme (and the individual Booklets, Tables of Factors and Key Features booklets and documents form part of the 'open book' approach) :
- OPQ Scheme is money purchase with the option to contract out;
- XYZ Scheme is final salary contracted out;
- RST Scheme is career average revalued earnings, not contracted out.
Learners are given five case studies to cover all three schemes and the range of member events defined in the units. They also have to write at least one letter to a member or client explaining the benefits payable and requesting whatever information is required before the scheme can pay the benefits.
- The case study examinations for Part 1 (Without Special Circumstances) contain case studies where the member has the schemes core entitlements only.
- The case studies in Part 2 (With Special Circumstances) are for members who have the supplementary or discretionary benefits listed in the units.
There is an on-line learning facility available for these units which provides a complete learning process including practising on old new examples each year and past examination papers (2 years). This is located at: https://www.cpc-learning-materials.com
The key to success in these examined units is practice
Learners can use the Learning Website to access the Scheme Booklets (relevent to the particular year of exam) and Past Papers to help them understand the schemes and the type of questions set.
Completing the Number Crunching Exercises on the Learning Website for revision and using the Past Examination Papers for comparing answers with the actual answers (suggested in the Examiners Report) will help identify any areas of knowledge that may need to be worked on.
The Number Crunching Exercises also have copies of the Letter response given in that particular situation, and it is advisable to practice against these and gain confidence in writing them for the actual exam itself.
How to write an essay
General Essay Writing Tips
Despite the fact that, as Shakespeare said, "the pen is mightier than the sword," the pen itself is not enough to make an effective writer. In fact, though we may all like to think of ourselves as the next Shakespeare, inspiration alone is not the key to effective essay writing. You see, the conventions of English essays are more formulaic than you might think – and, in many ways, it can be as simple as counting to five.
Steps to Writing an Essay
Follow these 7 steps for the best results:
- Read and understand the prompt: Know exactly what is being asked of you. It’s a good idea to dissect the prompt into parts.
- Plan: Brainstorming and organizing your ideas will make your life much easier when you go to write your essay. It’s a good idea to make a web of your ideas and supporting details.
- Use and cite sources: Do your research. Use quotes and paraphrase from your sources, but NEVER plagiarize.
- Write a Draft: Ernest Hemingway once said, “The first draft of anything is always crap.” While the truth behind this statement is debatable, drafts are always a good place to get any of your “crappy” ideas out of the way and are often required by professors and instructors.
- Make a strong thesis: The thesis (main argument) of the essay is the most important thing you’ll write. Make it a strong point.
- Respond to the prompt: Once you have worked out any kinks in your draft, you can start writing the final draft of your essay.
- Proofread: Read your response carefully to make sure that there are no mistakes and that you didn’t miss anything.
Of course, every essay assignment is different and it’s important to be mindful of that. If one of these steps isn’t applicable to the essay you are writing, skip it and move to the next one.
The Five Paragraph Essay
Though more advanced academic papers are a category all their own, the basic high school or college essay has the following standardized, five paragraph structure:
Though it may seem formulaic – and, well, it is - the idea behind this structure is to make it easier for the reader to navigate the ideas put forth in an essay. You see, if your essay has the same structure as every other one, any reader should be able to quickly and easily find the information most relevant to them.
The Introduction
The principle purpose of the introduction is to present your position (this is also known as the "thesis" or "argument") on the issue at hand but effective introductory paragraphs are so much more than that. Before you even get to this thesis statement, for example, the essay should begin with a "hook" that grabs the reader’s attention and makes them want to read on.
Examples of effective hooks include relevant quotations ("no man is an island") or surprising statistics ("three out of four doctors report that…").
Only then, with the reader’s attention "hooked," should you move on to the thesis.
The thesis should be a clear, one-sentence explanation of your position that leaves no doubt in the reader’s mind about which side you are on from the beginning of your essay.
Following the thesis, you should provide a mini-outline which previews the examples you will use to support your thesis in the rest of the essay. Not only does this tell the reader what to expect in the paragraphs to come but it also gives them a clearer understanding of what the essay is about.
Finally, designing the last sentence in this way has the added benefit of seamlessly moving the reader to the first paragraph of the body of the paper. In this way we can see that the basic introduction does not need to be much more than three or four sentences in length. If yours is much longer you might want to consider editing it down a bit!
Here, by way of example, is an introductory paragraph to an essay in response to the following question:
"Do we learn more from finding out that we have made mistakes or from our successful actions?"
"No man is an island" and, as such, he is constantly shaped and influenced by his experiences. People learn by doing and, accordingly, learn considerably more from their mistakes than their success. For proof of this, consider examples from both science and everyday experience.
The Body Paragraphs
The middle paragraphs of the essay are collectively known as the body paragraphs and, as alluded to above, the main purpose of a body paragraph is to spell out in detail the examples that support your thesis.
For the first body paragraph you should use your strongest argument or most significant example unless some other more obvious beginning point (as in the case of chronological explanations) is required.
The first sentence of this paragraph should be the topic sentence of the paragraph that directly relates to the examples listed in the mini-outline of introductory paragraph. A one sentence body paragraph that simply cites the example of "George Washington" or "LeBron James" is not enough, however.
Following this an effective essay will follow up on this topic sentence by explaining to the reader, in detail, who or what an example is and, more importantly, why that example is relevant. Even the most famous examples need context.
For example, George Washington’s life was extremely complex – by using him as an example, do you intend to refer to his honesty, bravery, or maybe even his wooden teeth?
The reader needs to know this and it is your job as the writer to paint the appropriate picture for them. To do this, it is a good idea to provide the reader with five or six relevant facts about the life (in general) or event (in particular) you believe most clearly illustrates your point.
Having done that, you then need to explain exactly why this example proves your thesis. The importance of this step cannot be understated (although it clearly can be underlined); this is, after all, the whole reason you are providing the example in the first place.
Seal the deal by directly stating why this example is relevant.
Here is an example of a body paragraph to continue the essay begun above:
Take, by way of example, Thomas Edison.
The famed American inventor rose to prominence in the late 19th century because of his successes, yes, but even he felt that these successes were the result of his many failures. He did not succeed in his work on one of his most famous inventions, the lightbulb, on his first try nor even on his hundred and first try. In fact, it took him more than 1,000 attempts to make the first incandescent bulb but, along the way, he learned quite a deal. As he himself said, "I did not fail a thousand times but instead succeeded in finding a thousand ways it would not work."
Thus Edison demonstrated both in thought and action how instructive mistakes can be.
A Word on Transitions You may have noticed that, though the above paragraph aligns pretty closely with the provided outline, there is one large exception: the first few words. These words are example of a transitional phrase – others include "furthermore," "moreover," but also "by contrast" and "on the other hand" – and are the hallmark of good writing.
Transitional phrases are useful for showing the reader where one section ends and another begins. It may be helpful to see them as the written equivalent of the kinds of spoken cues used in formal speeches that signal the end of one set of ideas and the beginning of another. In essence, they lead the reader from one section of the paragraph of another.
To further illustrate this, consider the second body paragraph of our example essay: In a similar way, we are all like Edison in our own way. Whenever we learn a new skill - be it riding a bike, driving a car, or cooking a cake - we learn from our mistakes. Few, if any, are ready to go from training wheels to a marathon in a single day but these early experiences (these so-called mistakes) can help us improve our performance over time. You cannot make a cake without breaking a few eggs and, likewise, we learn by doing and doing inevitably means making mistakes.
Hopefully this example not only provides another example of an effective body paragraph but also illustrates how transitional phrases can be used to distinguish between them.
The Conclusion
Although the conclusion paragraph comes at the end of your essay it should not be seen as an afterthought.
As the final paragraph is represents your last chance to make your case and, as such, should follow an extremely rigid format. One way to think of the conclusion is, paradoxically, as a second introduction because it does in fact contain many of the same features. While it does not need to be too long – four well-crafted sentence should be enough – it can make or break and essay.
Effective conclusions open with a concluding transition ("in conclusion," "in the end," etc.) and an allusion to the "hook" used in the introductory paragraph.
After that you should immediately provide a restatement of your thesis statement. This should be the fourth or fifth time you have repeated your thesis so while you should use a variety of word choice in the body paragraphs it is a acceptable idea to use some (but not all) of the original language you used in the introduction.
This echoing effect not only reinforces your argument but also ties it nicely to the second key element of the conclusion: a brief (two or three words is enough) review of the three main points from the body of the paper.
Having done all of that, the final element – and final sentence in your essay – should be a "global statement" or "call to action" that gives the reader signals that the discussion has come to an end.
In the end, then, one thing is clear: mistakes do far more to help us learn and improve than successes. As examples from both science and everyday experience can attest, if we treat each mistake not as a misstep but as a learning experience the possibilities for self-improvement are limitless.
Taken together, then, the overall structure of a five paragraph essay should look something like this: Introduction
Paragraph
- An attention-grabbing "hook"
- A thesis statement
- A preview of the three subtopics you will discuss in the body paragraphs.
First Body Paragraph
- Topic sentence which states the first subtopic and opens with a transition
- Supporting details or examples
- An explanation of how this example proves your thesis
Second Body Paragraph
- Topic sentence which states the second subtopic and opens with a transition
- Supporting details or examples
- An explanation of how this example proves your thesis
Third Body Paragraph
- Topic sentence which states the third subtopic and opens with a transition
- Supporting details or examples
- An explanation of how this example proves your thesis
Concluding Paragraph
- Concluding Transition, Reverse "hook," and restatement of thesis.
- Rephrasing main topic and subtopics.
- Global statement or call to action.
Drafting a Paper or Report
Some tasks/questions ask you draft a paper or a report rather than an essay, and learners are often confused about what that really means. When confronted with a request for a 'paper' or a ‘report’ to anyone, then many people struggle to know what to write.
What am I expected to do?
Start by reading the instructions in the assignment and interpreting the task. Interpreting the task is an essential part of the writing process as it will influence the quality and relevance of your writing.
When you write any paper or report you have to formulate a purpose, a question or a problem that you must answer based on the course literature and the literature that you are looking for. Papers or Reports often have a similar structure to a thesis.
Confusion often arises about the writing style, what to include, the language to use, the length of the document and other factors.
This next section aims to disentangle some of these elements, and provide you with some advice designed to help you to write a good report.
What is a Report?
In normal academic writing there is some overlap between Reports and Papers, and the two words are sometimes used interchangeably, but both are more likely to be needed for business, technical subjects, and for us, in the pensions workplace. Whereas an Paper presents arguments and reasoning, a Report concentrates on facts.
Essentially, a Report is a short, sharp, concise document which is written for a particular purpose and audience. It generally sets outs and analyses a situation or problem, often making recommendations for future action. It is a factual document and needs to be clear and well-structured. Reports may contain some or all of the following elements, so you should follow the guidelines given in the Communications Manual (here):
- A description of a sequence of events or a situation;
- Some interpretation of the significance of these events or situation, whether solely your own analysis or informed by the views of others, always carefully referenced of course (see our page on Academic Referencing for more information);
- An evaluation of the facts or the results of your research;
- Discussion of the likely outcomes of future courses of action;
- Your recommendations as to a course of action; and
- Conclusions.
Not all of these elements will be essential in every report.
A paper is not too disimilar, but it will ask a question that asks you to reason out an argument, to compare and contrast or to evaluate, but essentially the layout will be the same.
Title of Report
The title summarises the main idea or ideas of your report. A good title contains the fewest possible words that adequately describe the contents and/or purpose of your paper. The title is without doubt the part of a paper that is read the most, and it is usually read first.
Sections and Numbering
A report is designed to lead people through the information in a structured way, but also to enable them to find the information that they want quickly and easily.
Reports usually, therefore, have numbered sections and subsections, and a clear and full contents page listing each heading. It follows that page numbering is important.
Report Writing
The structure of a report is very important to lead the reader through your thinking to a course of action and/or decision. It’s worth taking a bit of time to plan it out beforehand.
Step 1: Know your brief
You will usually receive a clear brief for a report, including what you are studying and for whom the report should be prepared. First of all, consider your brief very carefully (normally the paerticular question within the exam/assignment) and make sure that you are clear who the report is for and why you are writing it, as well as what you want the reader to do at the end of reading: make a decision or agree a recommendation, perhaps.
Step 2: Keep your brief in mind at all times
During your planning and writing, make sure that you keep your brief in mind, and as above, who are you writing for, and why are you writing it? All your thinking needs to be focused on that, which may require you to be ruthless in your reading and thinking. Anything irrelevant should be discarded. As you read and research, try to organise your work into sections by theme, a bit like writing a Literature Review.
Make sure that you keep track of your references, especially for academic work. Although referencing is perhaps less important in the workplace or for an examinaton question, it’s also important that you can substantiate any assertions that you make so it’s helpful to keep track of your sources of information.
The Skeleton Structure of a Report
Like the precise content, requirements for structure vary, so do check what’s set out in any guidance. However, as a rough guide, you should plan to include at the very least an executive summary, introduction, the main body of your report, and a section containing your conclusions and any recommendations.
- Executive Summary
The executive summary or abstract, for a scientific report, is a brief summary of the contents. It’s worth writing this last, when you know the key points to draw out. It should be no more than half a page to a page in length. Remember the executive summary is designed to give busy 'executives' a quick summary of the contents of the report.
- Introduction
The introduction sets out what you plan to say and provides a brief summary of the problem under discussion. It should also touch briefly on your conclusions.
- Report Main Body
The main body of the report should be carefully structured in a way that leads the reader through the issue. You should split it into sections using numbered sub-headings relating to themes or areas for consideration. For each theme, you should aim to set out clearly and concisely the main issue under discussion and any areas of difficulty or disagreement. It may also include experimental results. All the information that you present should be related back to the brief and the precise subject under discussion. If it’s not relevant, leave it out.
- Conclusions and Recommendations
The conclusion sets out what inferences you draw from the information, including any experimental results. It may include recommendations, or these may be included in a separate section. Recommendations suggest how you think the situation could be improved, and should be specific, achievable and measurable.
If your recommendations have financial implications, you should set these out clearly, with estimated costs if possible.
A Word on Writing Style
When writing a report, your aim should be to be absolutely clear.
Above all, it should be easy to read and understand, even to someone with little knowledge of the subject area.
You should therefore aim for crisp, precise text, using plain English, and shorter words rather than longer, with short sentences. You should also avoid jargon. If you have to use specialist language, you should explain each word as you use it.
If you find that you’ve had to explain more than about five words, you’re probably using too much jargon, and need to replace some of it with simpler words.
Within your report you can also highlight where you would like to include a diagram/chart without being penailsed for formatting.
Consider your audience
If the report is designed to be written for a particular person, check whether you should be writing it to ‘you’ or perhaps in the third person to a job role: ‘The Chief Executive may like to consider…’, or ‘The minister is recommended to agree…’, for example.
A word on writing style
When writing your report, your aim shoud be to be absolutly clear. Above all, it should be easy and clear to read, even to someone who has little knowledge of the subject area.
You should therefore aim for crisp, precise text, using plain English, and shorter words rather than longer, with short sentences. You should also avoid jargon.
If you have to use specialist language you should explain each word as you use it.
If you find that you have had to explain more than about five words, then you are possibly using too much jargon and need to replce some of it with simpler words.
A Final Warning
As with any academic assignment, examination question or formal piece of writing, your work will benefit from being read over again and edited ruthlessly for sense and style.
Pay particular attention to whether all the information that you have included is relevant. Also remember to check tenses, which person you have written in, grammar and spelling.
It’s also worth one last check against any requirements on structure. For an academic assignment, make sure that you have referenced fully and correctly. As always, check that you have not inadvertently or deliberately plagiarised or copied anything without acknowledging it. Finally, ask yourself: “Does my report fulfil its purpose?” Only if the answer is a resounding ‘yes’ should you send it off to its intended recipient.
Learner Mental Health
Overview
If you’re struggling with your mental health whilst studying, you’re not alone.
A 2019 study of 37,500 students across the UK found that 87% reported struggling with feelings of anxiety, with 42% sharing that they are often or always worried, and a staggering 50% reported having thoughts of self-harm. These figures show a sharp 18% increase in anxiety levels since a similar study was conducted back in 2017.
Now, when you consider the 2020 pandemic on top of this, it's no surprise that nearly 1 in 3 (34%) claim that their mental health has deteriorated during these trying times. With these statistics in mind and the well-being of our students, we feel it's important that we share mental health information and resources with those who may need them.
While we’re by no means subject matter experts, below we review a few small - but significant - ways you can look after your mental health as a student or perhaps help others who may be struggling.
Talk to someone
As a society, we’ve come a long way in getting rid of the stigma surrounding mental illness but it can still be there so we appreciate that it can be really hard to speak up. However, bottling things up will only make them worse so you should try to find someone you can open up to. This could be your GP, your college or university’s support staff or a mental health charity. There are also a number of helplines that you can ring anonymously if you don’t feel up to talking in person yet:
- Anxiety UK – 03444 775 774 (Monday to Friday 9.30am to 5.30pm)
- Mind - 0300 123 3393 (Monday to Friday 9am to 6pm)
- No Panic - 0844 967 4848 (Every day 10am to 10pm for those suffering from panic attacks and/or OCD)
- Samaritans - 116 123 (24/7 helpline)
When you speak to a doctor or mental health professional or volunteer you won’t be judged. They speak to people just like you every day and will focus on getting you the help you need in whatever form that may take.
Let us know
We are to help you, so if you’re struggling to keep on top of your work you should let us know as soon as is possible. Please check the PMI policy on deferring your exam if you feel that this is the case.
This can be a daunting prospect but the sooner you let us know, the better – if you leave it too long you might leave it too long for us to do anything at all and you don't want (or need) that added stress.
Spend time with your friends and family
It can be all too easy to shut yourself off when you feel down – in fact, 75% of the students surveyed said they concealed their mental health from their friends – but isolating yourself often just makes things worse. While you may worry that your friends and family won’t understand the issues that you’re facing, you’d be amazed at how many people are likely going through similar issues who can empathise with what you're going through. Even if you're not ready to open up about how you’re feeling, spending some quality time with the people you care about can lift your spirits and make you feel less alone.
Review your course and situation
If you’re not happy with your course, where you live or the people who surround you, that can play a major part in causing or exacerbating mental health issues. Take some time to consider if the course and/or university or college are working for you. You might want to ask yourself:
- Is the coursework overloading you?
- Are you happy with the style of learning and support offered?
- Do you see yourself working in this field after you graduate?
- Are you happy with your living situation?
- Given the chance, would you make the same choices again?
It’s fine if you’re not sure about the answers to these questions. Give yourself some time to think it over – it could be that your mental health issues are causing you to feel unhappy with your surroundings, not the other way around.
Set aside some ‘me time’
If you’re feeling overwhelmed or under pressure, you might be thinking that you can’t afford to take time out to relax. However, it’ll be far more beneficial to your health and your studies in the long run if you regularly take some time off for yourself. Spend some each day time doing an activity you enjoy like cooking, catching up on your favourite TV shows or getting some exercise. Try to avoid studying late into the night and instead set yourself a cut off time and get into a relaxing routine. You could try things like taking a bath or shower, having a hot drink (maybe thing about a green tea rather than caffeine-heavy coffee!), reading a book that’s not related to your coursework, or doing some meditation activities. It’s up to you how you choose to unwind as you’ll know your own body and mind best. Just remember to try to get a full 7 or 8 hours of sleep a night to keep you on your best form.
Try saying ‘no’
If a growing list of looming obligations is contributing to stressing you out, it’s okay to make yourself the priority for a while and start saying ‘no’ when you need to. It’s never a good idea to cut yourself off completely but cutting down your list of commitments to the ones that matter most to you will help you avoid burning out. It can feel pretty empowering to say no, especially if it’s to an activity or event that would normally cause you stress or anxiety – so give it a try and reclaim control over how you spend your free time!
Create a schedule that gives you balance
Got a million tasks on your ever-growing to-do list and no idea how you’re going to have time to get through them all? Try making yourself a physical timetable that covers not just your academic work but your ‘me time’ and social activities too. You’ll likely feel that the mountain of work is a lot more manageable once you see everything laid out. Plus, having a clear plan for your time and sticking to it will give you some structure and make you feel a bit more in control – which can often give you a more positive outlook. Why not download our free study planner to get you started?
Don’t beat yourself up
Self-blame and mental health issues go hand in hand, and we know it can be so easy to punish yourself for feeling this way. People suffering from anxiety and depression often see themselves as weak or somehow lesser than other people because they’re struggling but this is simply not true!
Everyone the world over has suffered or will suffer from mental health issues at some point in their life. This is just a simple fact of being human – no one can be happy all the time. The severity of these issues will vary from person to person as will the way in which they tackle them, so you might find what works for your family or friends doesn’t work for you. The important thing is that you give yourself the support you deserve and take the first step to open up and let someone know how you feel so you can move forward with the confidence everything is going to be okay.
The Mental Health Tool Kit
The Mental Health Toolkit
Mental wellbeing is something that needs taking care of on an ongoing basis. It is possible therefore to create a mental health toolbox, incorporating as many as possible of the methods described here that are proven to support mental wellbeing. By taking a positive attitude towards maintaining mental wellbeing it can help prevent the likelihood of becoming overwhelmed. Maintaining a healthy diet, exercise, good sleep habits, having meaningful social interaction, working towards realistic and achievable goals, undertaking meditative and embodied practices, such as mindfulness and yoga, are all ways in which support and help individuals to become, and stay, the healthiest version of themselves, both physically and mentally.
Looking After Mental Health Day to Day - We Have the Power
While the ways in which we choose to look after ourselves differ, and we all enjoy different things. The first thing to remember is the influence that we have, the power that we have, over our own mental wellbeing when we approach it with a positive mindset. This doesn't mean only focusing on positive thoughts and attempting to root out any kind of negative emotion or thinking from our lives — not at all. It is important not to resist negative emotions because all emotions are healthy in moderation, and, in many situations, negative emotions can be extremely helpful in guiding us away from things that aren't right for us or that could harm us. It can be helpful to frame emotion and cognition as our internal system trying to keep us safe and guide us. The point is, as the comedian Jim Carrey says,
'...Depression is legitimate….’
Also, if you don't exercise, eat nutritious food, get sunlight, get enough sleep, consume positive material, surround yourself with support, then you aren't giving yourself a fighting chance.' Without support, it can be incredibly hard, or impossible, to muster the momentum to take on all of these lifestyle adaptations, while feeling depressed or anxious, but this course is also here to help you to find preventative measures, to keep yourself well. Staying mentally well requires commitment, time and repetition. Just like anything else, you don't become a master at it overnight, and consistency is far more effective than sporadic intensity. Of course, wellbeing practices don't ward off difficult life circumstances beyond our control, but they do help support our wellbeing, to the extent that when something challenging happens, we will be much more likely to be able to handle it and remain mentally and physically healthy.
Mindset and Self-awareness
Most of us take our thinking patterns for granted, or, if they serve us well, don't particularly notice them. However, when negative thinking becomes a problem, we can find ourselves very distressed by our thoughts. This is because the brain can't really distinguish thought from reality — in many ways, what we think is our reality. This is why the mindset is so powerful. Mindset includes your beliefs about yourself, life, the world and other people, as well as your attitude to daily wellness. The best way in which to begin working on your mindset is to become self-aware as to what your existing patterns of thought may be, and where they may be preventing you from accessing a higher level of wellbeing. This is a very simple practice, which costs nothing, yet it can bring huge rewards. It simply requires patience, open-mindedness and a non-judgemental quality, as you discover your inner patterns. For example - If you find yourself reflecting about improving your diet and thinking, 'Oh, but I can't cook' or 'I don't know how to serve more vegetables' or 'I couldn't live without Coca-Cola,' the practice of self-awareness is to notice this, and then consider what might be a healthier mindset to cultivate around these specific ideas. This is often what is meant when people talk about 'self-talk': the way in which we internally talk to ourselves about things. It is completely possible to alter your self-talk, and when we do, the differences can be profound. It can also be helpful to imagine yourself as another person or as a friend. Would you say to that other person or friend the things you say to yourself? Most of us experiencing negative thinking wouldn't dream of it. Yet, if you were to talk to that friend in that way, how would you expect them to feel? This reflective self-awareness mindset practice can help us to foster greater compassion towards ourselves, which, for many people, is one of the absolute foundations in establishing better mental health.
Diet
While this is not a nutrition for mental health web site, there is a huge amount of evidence supporting the central role of nutrition in our total health, both physical and mental. There is no definite separation between physical and mental health because your brain is part of your body! If you're not nourishing your body with good nutrition, neither are you properly feeding your brain. Diets high in saturated or trans fats, salts, sugars and calorie-high, but nutrient-poor, foods, such as fast food, are associated with all manner of health problems. The most commonly reported are obesity, heart disease, diabetes and some cancers, but the elephant in the room is very often mental illness. Having a physical illness is also a burden mentally, and this is something that is often overlooked. Put simply, to be a healthy, balanced human being, it is vital to eat a healthy, balanced diet.Without this central nutritional support, you simply can't be the healthiest version of you.Diets rich in whole, unprocessed foods, with a high vegetable content and limited consumption of animal products and a wide variety of fresh ingredients across all the food groups (protein, carbohydrate, fats, fibre) are proven to support better vascular, digestive, metabolic, cognitive, emotional, endocrine (hormonal), reproductive and musculoskeletal health. It is also vitally important to stay well-hydrated and to limit or cut your intake of alcohol, stimulants, such as caffeine, and any other substances upon which you may feel that you have some kind of dependency.
Exercise
A lot of work within the sector is not physically demanding, very often, work activities can be repetitive and limited in their scope of movement. This makes doing regular, balanced exercise a high priority. The body stays healthiest when we do varied exercise, which uses all of our muscles and joints, but also takes different forms: combining aerobic (cardio) exercise with strength and mobility exercises is the best approach. It is recommended that you look at the NHS website, for ideas and inspiration. The key thing to remember is that exercise releases endorphins, which are powerful mood-lifting hormones and which can have a hugely beneficial effect on our mental health when we experience their release daily or at least multiple times per week through exercising. Human beings did not evolve to sit still or to only perform repetitive, static actions, but even small changes can create massive improvements to our wellbeing. Exercising for only 30 minutes per day can help people to make huge transformations in their health and in the way they feel, both physically and mentally.
Sleep
Getting enough sleep is instrumental for good physical and mental wellbeing. Sleep is a powerful restorative process for the human body, which helps our cells to repair themselves, but it is also vital to our memory and healthy cognitive processing. It is recommended that we get 6-9 hours of sleep per night, and, as much as possible, that we stick to a routine, preferably within the natural circadian rhythm of being awake during daylight hours and asleep during the night. Winding down before sleeping is a very effective way in which to ensure a higher quality of sleep and to relax, which can be very beneficial when dealing with anxiety and stress. Doing gentle stretches before bed can help to relieve residual muscle tension, which also helps bring about deeper sleep. If you have trouble drifting off, listening to a meditation or relaxation recording can help. For more advice on improving your sleep, visit NHS online resources.
Set Wellbeing Goals
Feeling a sense of empowerment is greatly helped by having realistic goals that you can work towards and then achieve. Make sure that the goals that you set are 'SMART': specific, measurable, achievable, realistic and time-bound, and get creative. If goals are not realistic or achievable — or take so long to realise that you lose focus — then the experience of goal setting can become counterproductive and lead to feelings of demoralisation and despair because they will not seem achievable or be achievable. Create a bite-size approach towards working on each of these areas of wellbeing, and don't expect to suddenly be able to overhaul your whole life in one go. Perhaps start with exercise and aim to go for three 30-minute walks per week, or start with diet, and aim to include at least your five-a-day every day. Achievable, workable goal setting is a fantastic way in which to gain a sense of control around your wellbeing and also to ensure that you are fostering habits and practices that will build you up and nourish you, rather than drain and deplete you. It can also be incredibly helpful to draw up a Wellbeing Action Plan at work, and this may be something that you could suggest if there is not already provision for this. This is a way in which to become more conscious about the things that help you, and others, take care of mental health and begins with noting down the things that you notice help to keep you feeling well and balanced. From this list of your personal resources you can then deliberately work these experiences into your weekly routine, to help ensure that you can maintain your mental and physical wellbeing. For example - Going for walks, eating well, having relaxing baths and spending time with friends, family or pets.
Social Wellbeing
As humans, we are social creatures, and we thrive on authentic connection with others. If this is missing in your life, ask yourself where you might be able to find it. Do you have particular interests or enthusiasm for a hobby or pursuit? Connecting over a shared pastime or interest is a great way in which to build relationships and bonds with people. Having strong bonds in your life, in general, can provide a healthy backbone for carrying this forward into the workplace because it not only encourages positive interactions but helps build a sense of perspective, relieving some of the social pressures felt when the only people with whom you interact or see week to week are your workmates. The biggest pressure on mental well-being over the last 18 months has been working from home. More and more studies are starting to be produced now that tell us what we already know. We need to be with people, around people and communicating with people, may be not as often as before, but certainly not as little as we have had to do.
Mindfulness Practices, Meditation and Yoga
These practices can be grouped as 'embodied' practices — practices that bring your awareness directly into the present experience of your mind and body, just as they are. If you are in the midst of intense depression or anxiety, these practices may feel a little uncomfortable to begin with, but they are also proven to help people overcome these mental health problems. Mindfulness is a type of meditation, and, essentially, it is the practice of observing your experiences, as they are happening, instead of simply behaving, thinking and feeling on 'autopilot'. Many people find that bringing mindfulness into their life affords them a window of greater inner autonomy and can help them to regulate their reactivity to triggering situations and to quite naturally learn how to manage their mental and emotional wellbeing. Other forms of meditation, such as focusing on your breath or a particular object, while allowing thoughts and sensations to arise, are proven to be of a significant therapeutic mental health benefit. Yoga comes from a similar traditional lineage and helps you to integrate your awareness of mind and body. Many people find yoga practice relaxing and calming, and the emphasis on deep, conscious breathing in yoga practice also literally soothes the nervous system, helping to diminish the physical and psychological symptoms of anxiety, while also improving strength, flexibility and bone density.
Talking Openly
Conversation can be such a powerful resource. People so often overlook this or forget it, but simply chatting through your experience with another person or a group can not only be immensely freeing for you, but it also frees and empowers others to share their true feelings and experiences. This fosters closer relationships and a greater sense of belonging and helps to dissolve feelings of loneliness and separation. It doesn't matter who you talk to, either — the very core experience of relating to another person provides a deeply therapeutic benefit.
References
References:
The materials for this website have been collated from a number of sources:
Apps, Jerold W. Study Skills for Adults Returning to School. New York: McGraw-Hill Book Company, 1982.
Carney, Tom, and Barbara Carney. Liberation Learning: Self-Directed Learning for Students. Windsor, Ontario: Para-Publishing Enterprises, 1988.
Deese, James, and Ellin K. Deese. How to Study. New York: McGraw-Hill Book Company, 1969.
Ellis, David B. Becoming a Master Student. Rapid City, South Dakota: College Survival, Inc., 1993.
Fleet, Joan, Fiona Goodchild, and Richard Zajchowski. Successful Learning. London, Ontario: University of Western Ontario, 1987.
Hanau, Laia. The Study Game. New York: Barnes & Noble Books, 1979.
Jones, Bill, and Roy Johnson. Making the Grade. Manchester, UK: Manchester University Press, 1990.
MacFarlane, Polly, and Sandra Hodson. Studying Effectively and Efficiently: An Integrated System. Toronto: University of Toronto, 1983.
Nilsson, Virginia. Improve Your Study Skills. Athabasca, Alberta: Athabasca University, 1989.
Pauk, Walter. How to Study in College. Boston: Houghton Mifflin Company, 1984.
Robertson, Heather. Bridge to College Success. Boston, Massachusetts: Heinle & Heinle Publishers, 1991.
Simpson, Sarah. Essential Study Skills, London, England: Bookboon, 2015.
University of British Columbia. Strategies for Studying. Victoria, British Columbia: Orca Publishers, 1996.
Walter, Tim, and Al Siebert. Student Success. New York: Holt, Rinehart and Winston, 1987.
Witherspoon, Del, and Eugenie Nickell. Back to School at My Age? Lanham, Maryland: University Press of America, 1991.